
This is the second part of te article how to create a provisioning system for allowed domains. In the first part we started with creating a SharePoint List to store all the requests. After we created the list we started creating the approval flow.
In this part we will finish the flow and will create the Azure Runbook to configure the allowed domains in our tenant.
Before we continue with our Microsoft Flow we first need to jump to Azure and configure our Azure Runbook.
The steps required can be divided in 4 sections:
- Create an Azure Automation Account
- Adding credentials which can be used within the runbooks
- Upload the Skype for Business PowerShell module
- Create the script which needs to be executed
Create an Azure Automation Account
To perform this task we first need to create an Azure Automation Account this can be done by following the steps below:
- Browse to https://portal.azure.com
- In the Search field enter Automation Accounts
- Select the Automation Accounts from the Services section
- Select Add
- Provide a Name
- Select the correct Subscription
- Select the Resource group
- Select the Location (select the region closest to your O365 tenant)
- CLick Create
The creation of the account might take several minutes.
Adding credentials
Once the task has been created we can continue with adding the credentials which will be used by the automation account to connect to our Teams tenant. An important thing is that the account you want to use for this should NOT be enabled for MFA and has been assigned the Teams Service Administrator permissions.
To do this perform the following steps:
- Select the automation account created
- In the left menu browse to the Shared Resources and select Credentials
- Select Add a credential and provide a username and password which can be used to connect to the Teams tenant
- Provide the username and password and select Create
Remark: Since it does not have MFA it is a good idea to monitor > the usage of this account to ensure it is not abused. > Guidance how to do this can be found here:
https://docs.microsoft.com/en-us/azure/active-directory/users-groups-roles/directory-emergency-access#monitor-sign-in-and-audit-logs
Now the credentials are added the next step is to add the Skype for Business Online PowerShell module to our automation account. By default several PowerShell modules are included such AzureRM modules. To make the Skype for Business Online Module available we first need to install it on a local machine. If you don’t have it installed you you can download the latest version of the module from the linke below:
https://www.microsoft.com/en-us/download/details.aspx?id=39366
Remark: If you already had the module installed make sure it is the latest version available. During the preparation of writing this blog I also hit an issue where uploading the PowerShell module failed with different errors. Upon further investigation I found out that I did not had the latest version of the module installed. Once the most recent version of the module was installed the PowerShell module could be uploaded without an issue.
Once the Skype for Business Online PowerShell module is installed we need to zip the module so we can upload it to Azure. Perform the following steps:
- Browse to C:\Program Files\Common Files\Skype for Business Online\Modules
- Zip the SkypeOnlineConnector directory
- Ensure the zip is named SkypeOnlineConnector.zip
Now we zipped the PowerShell module the next step is to upload it to Azure so we can use it in our Azure Runbook. To do this perform the steps below:
- Go back to Azure Automation Accounts**
- Select the automation accounts created earlier
- In the Shared resources section select Modules
- From the main pane select Add module
- In the Add a module window select the zip file and press OK
Importing the module might take several minutes. Once the module is imported it is time to create the Runbook.

Now the module has been important we can provide the script which needs to be executed everytime the runbook is executed. To create the runbook perform the following steps:
- In the Process Automation section select Runbooks
- Select Create a runbook from the main pane
- Provide a Name and make sure Runbook type is set to PowerShell
- Select Create
- In the main pane add the script below:
param(
    [string] $domainName
)
# Get stored credentials
$credential = Get-AutomationPSCredential -Name 'svc_sfb_automation'
# Connect to tenant
$session = New-CsOnlineSession -Credential $credential
import-pssession $session -AllowClobber|Out-Null

# Initialize variables
[bool] $dnsValidation = $false
[string] $proxyFqdn = ""
[string] $result = ""
[string] $fedrecordresult = ""
$fedrecord = "_sipfederationtls._tcp." + $domainName

# Retrieve current allowed domain list
$tenantConfig = Get-CsTenantFederationConfiguration
$domain = $tenantConfig.AllowedDomains.AllowedDomain | ?{$_.Domain -eq $domainName}

if($domain -ne $null)
{
    Write-Warning "Domain is already part of allow list, skip processing"
}
else
{
    # Validate if sipfederation record exists
    $uri = "https://dns.google.com/resolve?name={0}&type=srv" -f $fedrecord
    $dnsresolve = Invoke-RestMethod -uri $uri

    if($dnsresolve -ne $null)
    {
    $proxyFqdn = $dnsresolve.answer.data.split(" ")[3].trimend(".")
    $dnsValidation = $true
    }

    # If the domain is not in the list and the dns record exists add the domain to the allow list
    if ($domain -eq $null -and $proxyFqdn -ne $null)
    {
        $allowedDomain = New-CsEdgeDomainPattern -Domain $domainName
        $tenantConfig.AllowedDomains.AllowedDomain.Add($allowedDomain)|Out-Null
        Set-CsTenantFederationConfiguration -Tenant $tenant.tenantID  -AllowedDomains $tenantConfig.AllowedDomains

        $tenantConfig = Get-CsTenantFederationConfiguration
        $domainresult = $tenantConfig.AllowedDomains.AllowedDomain | ?{$_.Domain -eq $domainName}

        if($domainresult -ne $null)
        {
            $result = "succeeded"
        }
        else
        {
            $result = "failed"
        }
    }
    else
    {
        $result = "failed"
    }

    # Create result object
    $Results = New-Object -Type PSObject
    $Results | Add-Member -Type NoteProperty -Name "domainName" -Value $domainName
    $Results | Add-Member -Type NoteProperty -Name "dnsValidation" -Value $dnsValidation
    $Results | Add-Member -Type NoteProperty -Name "proxyFqdn" -Value $proxyFqdn
    $Results | Add-Member -Type NoteProperty -Name "Result" -Value $result
}

# Return results
Write-Output $Results|ConvertTo-Json
Remove-pssession $session
- Once the script has been added select Save
- Optionally you can select Test Pane and test the runbook. Keep in mind that this adds the domain to the allowed domain list.
- Once your happy with the results select Publish
Updating Flow
Now we have created the runbook let’s make sure that once the item is approved the item in the SharePoint list will be updated. To do this we need to add an update item block in the If yes tree from the workflow.
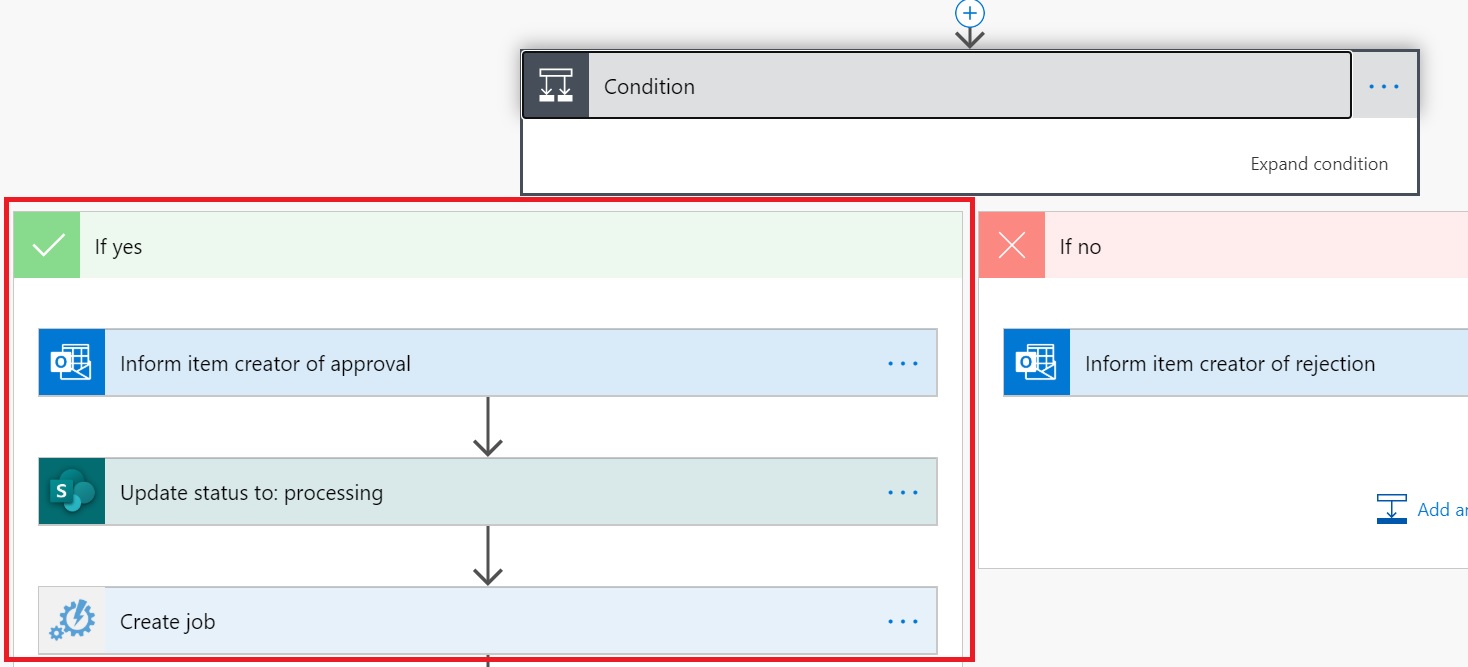
Once the update item block has been added update perform the following tasks
- In the Site Address select the SharePoint site which contains SharePoints list used to be stored the allowed domains
- In the List Name select the list containing the allowed domains
- in the Id select the Id parameter from the When a new item is created section
- In the DomainName select the DomainName parameter from the When a new item is created section
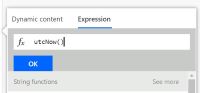
- In the DateApproved select Expression and enter Utcnow() as the value of the expression and press OK
- Update the value of the status field to processing
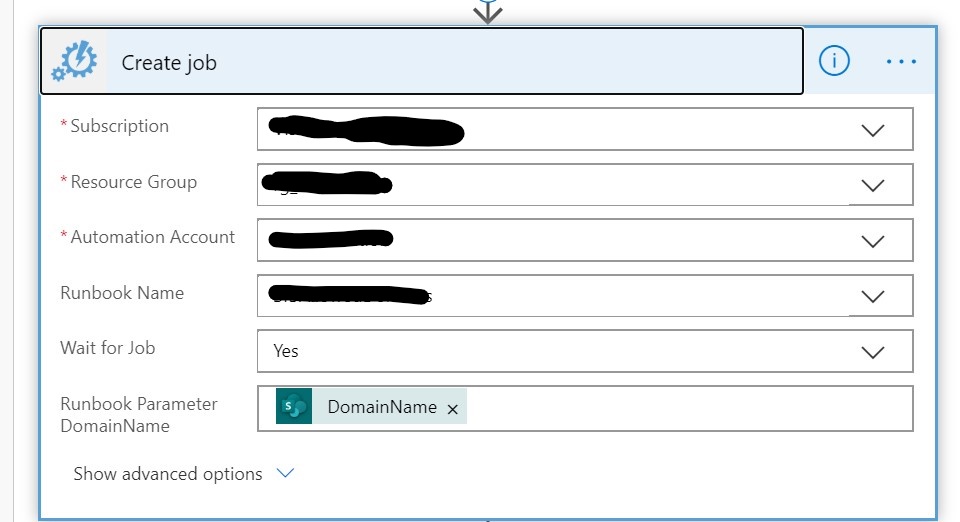
In the flow add a Create Job block. This block is not part of the default set and requires an additional license which support the Premium features.
Once you have inserted the block perform the following steps:
- Make sure the correct Subscription is selected
- Select the resource group the drop down list and make sure it is the same as the automation account created earlier
- Create the earlier created Automation Account
- Select the earlier created Azure Runbook from the drop down menu in the RunBook Name field
- Set Wait for Job to Yes
- Select the SharePoint field value DomainName as the value for the Runbook Parameter DomainName field
Now we have added the job we need to retrieve the results from the job. Reason for this is that we need the results from the job to populate the Result field in our SharePoint list.
To get the results from the Azure Runbook add a Get job output block and configure it as follows:
- Select the correct Azure Subscription in the Subscription field
- Add the same Resource Group as in the Create Job block
- Select the same automation account as used earlier
- Select the Job ID as value from the Job ID field. This can be done by clicking in the field and select Job ID from the list of available parameters
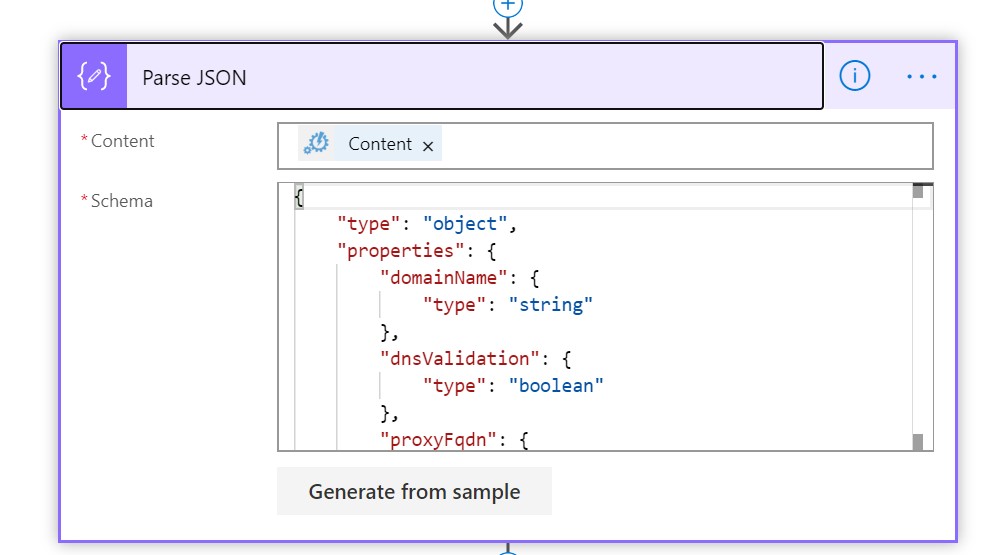
Since we generated a JSON output using our script we need to use a Parse JSON block to parse the results from the Azure Runbook.
Before adding the block make sure you have an example of the JSON output which can be used to generate the schema. You can get this by running the Azure Runbook once manually.
If you want to take the easy route add the following content to the Schema field of the Parse JSON block.
{
    "type": "object",
    "properties": {
        "domainName": {
            "type": "string"
        },
        "dnsValidation": {
            "type": "boolean"
        },
        "proxyFqdn": {
            "type": "string"
        },
        "Result": {
            "type": "string"
        }
    }
}
In both scenarios select the Content parameter from the Get job output section by clicking somewhere in the Content field from the Parse JSON block.
Now we have the result of the runbook stored in an object we can access the properties of the object and use them in the workflow.
We are going to check the value of the Result property. If it is set to succeeded we know the allowed domain has been succesfully added to the allowed domain list, if it has a different value it has failed.
Based on this condition we can update the SharePoint list and send an e-mail to the requestor that the request has been completed either successfully or has failed.
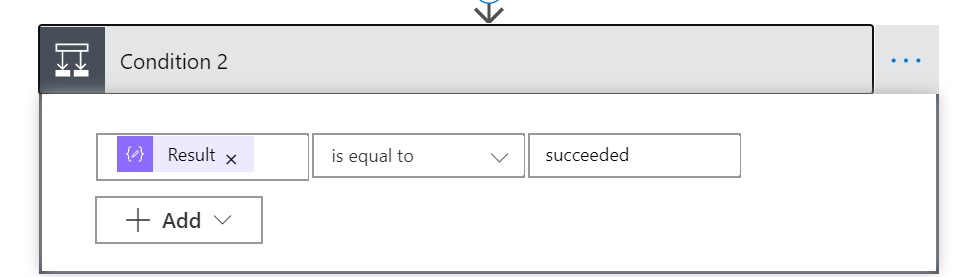
Add a Condition block to the workflow below the Parse JSON block.
Click in the Choose a value field and in the Search dynamic content field enter Result. This will return the Result property from the Parse JSON object. Leave the is equal to value as is and set the value to succeeded.
In the If yes tree add two blocks:
- update item
- send an email (V2) 2
Update item
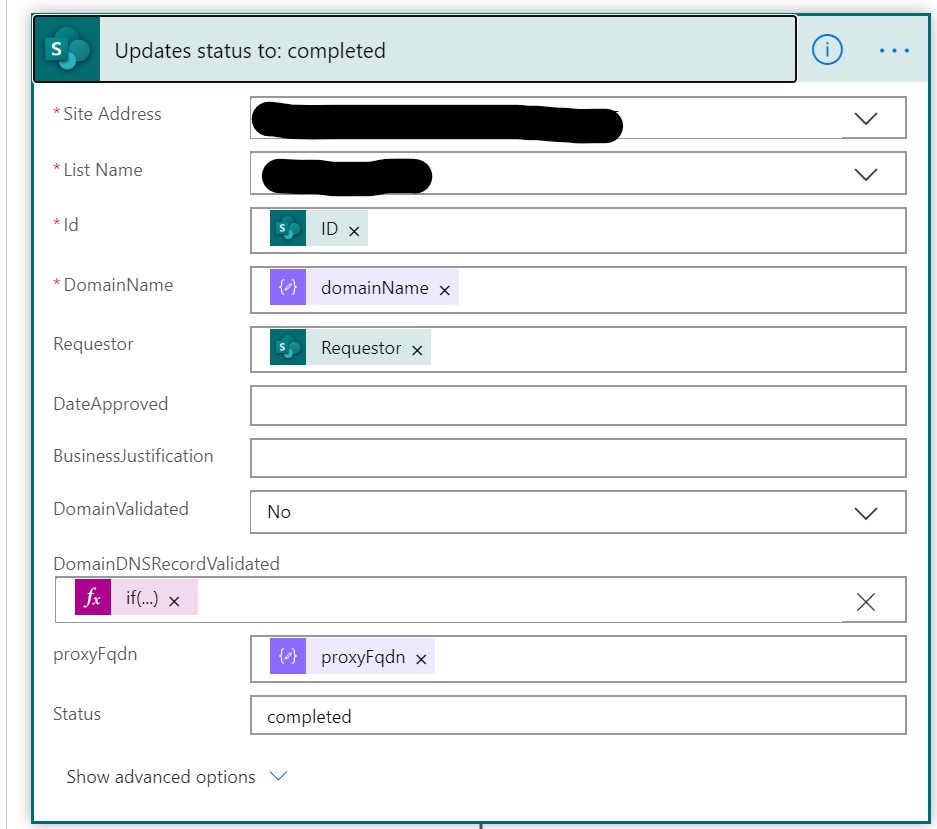
This update item block will be used to update the item in the SharePoint list. Make the following changes once you added the block:
- In the Site Address select the SharePoint site which contains SharePoints list used to be stored the allowed domains
- In the List Name select the list containing the allowed domains
- in the Id select the Id parameter from the When a new item is created section
- In the DomainName select the DomainName parameter from the When a new item is created section
- In the Requestor field add the Requestor parameter from the When a new item is created
- Set the DomainValidated to No
- The value for the DomainDNSRecordValidated field will be set by using a function. Select Expression and specify the expression as follows:
if(equals(body('Parse_JSON')?['dnsValidation'],bool('true')),bool('true'),bool('false'))
- In the proxyFQDN field add the proxyFQDN property from the Parse JSON section
- Set the Status field to completed
Send an email
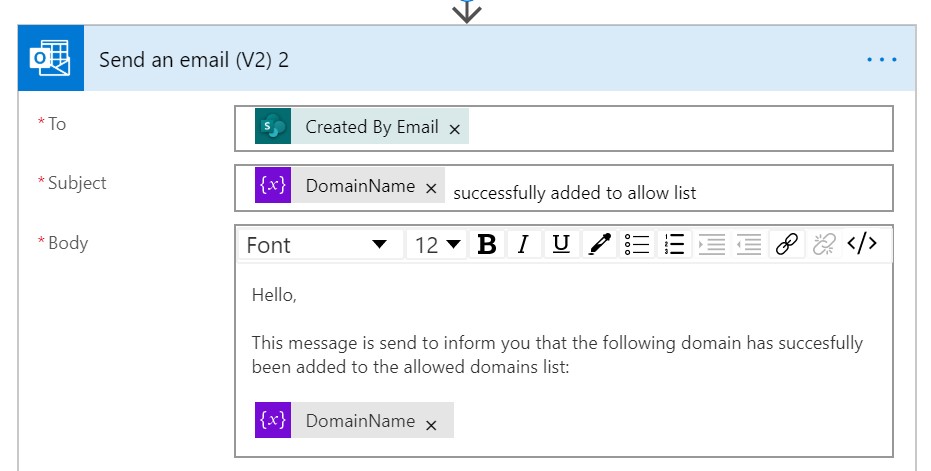
The last step is to update the fields of the Send an email(V2) 2 block.
- In the To field add the Created by Email from the When a new item is created section
- In the Subject field add the DomainName from the variables section and add some additional text, for example successfully added to allow list
- In the Body field enter text which you want to send to the requestor
- Optionally you can change the from address by selecting Show advanced options
In the If no tree we will do exactly the same as in the If yes tree.
Update item
- In the Site Address select the SharePoint site which contains SharePoints list used to be stored the allowed domains
- In the List Name select the list containing the allowed domains
- in the Id select the Id parameter from the When a new item is created section
- In the DomainName select the DomainName parameter from the When a new item is created section
- In the Requestor field add the Requestor parameter from the When a new item is created
- Set the DomainValidated to No
- The value for the DomainDNSRecordValidated field to No
- Set the Status field to failed
Send an email
The last step is to update the fields of the Send an email(V2) 2 block.
- In the To field add the Created by Email from the When a new item is created section
- In the Subject field add the DomainName from the variables section and add some additional text, for example was not added to the allowed domain list
- In the Body field enter text which you want to send to the requestor
- Optionally you can change the from address by selecting Show advanced options
Here end the second part of the multi-part article on how to create a provisioning system for allowed domains in Teams. In this part we started with configuring the Azure piece of the provisioning system. Once that was completed we updated our flow to execute the Azure Runbook, update the SharePoint List and sending an e-mail to the requestor.
In the next part we will look at how to build a more user friendly way to add a domain to the allowed domain list. How we are going to do that remains a surprise ;-)
Comments
