
In the first part of this blog we looked at the theory and some examples. In this blog we will continue with configuring and managin the DAG.
In this case we have an environment which consists out of two multirole Exchange 2013 servers. Because this is not an odd amount we will need to use a file share witness. Ideally this fileshare witness is placed on another Exchange server (for example your CAS) but it can also be located on an generic server.
First step is to prepare our FSW. It is important the Exchange Trusted Subsystem is a member of the local administrators group of the server. This because Exchange uses this account under the hood to perform the needed actions.
If the server doesn’t contain the File Server feature add it by using the following Powershell cmdlet:
Add-WindowsFeature FS-FileServer
Once these actions have been performed we can continue with configuring our DAG.
If you are familiar with DAG’s from Exchange 2010 pay attention to the next step. You will need to pre-stage the Cluster Name Object (CNO). Open ADUC and create a computeraccount which matches the name you want to give to the DAG, for example DAG01. After creating the object disable the account and get the properties of the object. Select the security tab and add the computeraccount of the computer which will be the first member of the DAG. Repeat this last step for the Exchange Trusted Subsystem security group.
Of course you can also script the creation of this object. Fellow The UC Architects member Michel de Rooij has created a script which can be found here.
Next step is to create the DAG, we will use the Exchange Management Shell for this:
New-DatabaseAvailabilityGroup -Name Exchange_DAG01 -WitnessServer FS01 -WitnessDirectory C:\Exchange_DAG01 -DatabaseAvailabilityGroupIpAddresses 192.168.1.90
By using the cmdlet above we will create a DAG which has the name DAG01 and assign FS01 as the witness server. On the FS01 a directory will be created called Exchange_DAG01. As last step we will assign an IP address to the DAG 192.168.1.90.
Now we have created the DAG it’s time to add the mailbox servers to it. This can be done by using the Add-DatabaseAvailabilityGroupServer cmdlet:
Add-DatabaseAvailabilityGroupServer -Identity DAG01 -MailboxServer EX01
Remark: If the Windows Failover Clustering components are missing the cmdlet will install then automatically. Keep in mind that this might require a restart of your Exchange Server. The cmdlet will in that case only install the components and will not add the server to the DAG. So if the server is rebooted run the cmdlet again to add the server to the DAG. However it may not be required to reboot the server in that case the server will be added to the DAG directly.

Once the first server is completed repeat the same step for the other server:
Add-DatabaseAvailabilityGroupServer -Identity DAG01 -MailboxServer EX02
To finish the configuration of the DAG we will need to add the additional copies of the databases. For adding a copy you will need to use the Add-MailboxDatabaseCopy cmdlet:
Add-MailboxDatabaseCopy -Identity MBDB01 -MailboxServer EX02 -ActivationPreference 2
![]()
After the copy is added you will need to restart the Microsoft Exchange Information Store service on the target server. This has to do with the “Managed Store” as introduced in Exchange 2013. Collegue Exchange MVP Tony Redmond published a nice blog. So if you want to know the indept details I recommend to visit this page.
This will add a copy of the database called MBDB01 to mailboxserver EX02 and will set the activation preference to 2.
Repeat the step for the database hosted by EX02:
Add-MailboxDatabaseCopy -Identity MBDB02 -MailboxServer EX01 -ActivationPreference 2
Once the cmdlets have been ran you can use the Get-MailboxDatabaseCopyStatus cmdlet to verify the status of the databases and its copies:
![]()
In the example above the first copy is mounted and the content index state is healthy. However for the second copy of the database the content index is FailedAndSuspended. In case of a *over this results in users who will start to have issues when searching their mailbox.
To fix this issue we need to run the Update-MailboxDatabaseCopy cmdlet like this:
Update-MailboxDatabaseCopy -Identity MBDB01\EX02 –CatalogOnly
After the confirmation the catalog will be updated on the second copy:
![]()
Let’s look at another issue:
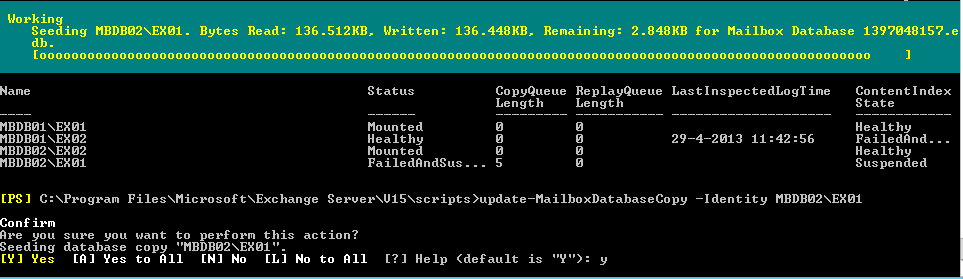
![]()
In this case the second copy failed completely so we do have to update both the database and the catalog:
Update-MailboxDatabaseCopy -Identity MBDB02\EX01
After confirming the reseed is performed and both the database and catalog should be healthy again.
If we want to perform maintenance on the DAG members we will need to put the member in maintenance mode. This can be done by using the StartDagServerMaintenance script which can be found in the default script directory of Exchange.
![]()
By adding the Server parameter we can specify a server which we would like to put in maintenance. Once this is done it will check if the PAM role and which databases are currently activated on the server and will try to move them to another DAG member.
Once we have performed some maintenance on EX02 we will need to take it back in production. This can be done by using the StopDagServerMaintenance script:
.\StopDagServerMaitenance.ps 1 –Server EX02
Once this script has been executed verify if the databases are healthy using the Get-MailboxDatabaseCopyStatus cmdlet. The script will not re-balance the databases so we will need to do this manually. To move the active database we need to run the Move-ActiveDatabase cmdlet:
Move-ActiveMailboxDatabase MBDB02 –ActivateOnServer EX02
![]()
After confirming the activation on the other server the database will be moved to EX02.
Here ends the second part of the Exchange Alphabet about Database Availability Groups. In this part we had a look how to create a DAG and perform several operations
Comments
